We use HubSpot’s CRM every day. It's a pretty incredible platform that helps us stay on top of incoming leads and land new customers without dashing from pillar to post; pasting data into spreadsheets or worrying about whether or not we’ve followed up on an enquiry in good time.

But it took us a while to get here. See, HubSpot’s sales platform is a bit of an iceberg. Deceptively simple on the surface, but chock-full of hidden features and customisations that are key to unlocking its full potential.
Things like:
- Gmail integrations that let you BCC emails to log them in your CRM
- Custom fields that you can use to filter leads by user-defined variables
- Automation tools that allow you to keep your pipeline up to date
We spent a lot of time ignoring certain features and overlooking others entirely, so we decided to pen a no-nonsense guide for new users – shining a light on the things we missed and helping you to extract maximum value from your Sales Hub™ subscription if you're not budgeting to invest in a HubSpot onboarding service.
Tip #1: Integrate All Of Your Toys
HubSpot’s supposed to offer a complete ecosystem; an end-to-end service that takes care of everything from your web contact forms to booking a meeting with a potential customer. We’ll be the first to admit that it does - occasionally - miss that mark, but it’s ability to integrate with the overwhelming majority of 3rd party platforms more than makes up for any gaps in its core functionality.
Straight out of the box, Hubspot will sync up with everything from Xero to Magento, allowing you to import data from multiple platforms, and creating a centralised hub for all of your sales and marketing data.
But it’s their email integrations that add the most value. Connect HubSpot’s CRM to your inbox and you’ll be able to read and reply to form fills when you’re out and about, see every email sent via the main CRM in your sent mail folder and BCC emails to your CRM to automatically log activity under contacts or organisations.
And trust us, there’s something very satisfying about logging into your CRM and seeing a nice, neat log of every email and phone call you’ve exchanged with a client.
If you’re working with a big sales team, email integrations ensure that everyone has visibility over the sales process and removes the risk that two or more people will follow up on an enquiry.
If you’re working on your own, it completely negates the need to keep jumping in and out of HubSpot – saving you hours of busywork and allowing you to focus on what’s going on in your inbox.
When Databox asked 25 HubSpot experts for their top tips on getting the most out of HubSpot’s CRM, 30% of them said that integrating your email was the single most impactful thing you could do, and we’d be hard-pressed to disagree.

Connecting Your Email To HubSpot
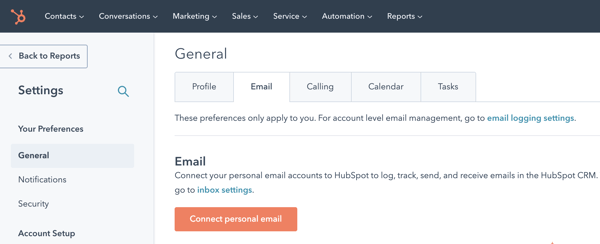
Connecting an email account is dead simple: Just click the settings icon to the top right of the main HubSpot toolbar, use the drop-down menu to navigate to ‘general’ and click connect personal email.
 Then it’s just a case of picking the type of email account you’d like to integrate and following the prompts on the screen.
Note: You can’t connect your email to HubSpot using POP3 email accounts, because POP3 downloads emails directly to your machine. Use IMAP instead and if you don’t understand what any of these words mean, reach out to our dev team. We’re more than happy to help you sort out any compatibility issues and make sure your email is hooked up correctly.
If you’re using Gmail, you can also download the HubSpot extension for Google Chrome. This nifty little extension allows you to track and log your emails using special buttons, and it also allows you to use some of SalesHub’s automation tools direct from your inbox which can be a big time saver.
Tip # 2: Customise Everything
HubSpot’s CRM tracks a lot of data about your leads, but customisation is key to using HubSpot effectively. Every contact and organisation can be assigned custom fields, and you can use these fields to filter your lists – allowing your sales team to drill down and identify a specific subset of potential customers in a matter of seconds.
You could set up custom fields that track a lead’s preferred solution or product, so that you can assess their rough value and work out how much time you want to spend chasing them.
Or you could set up a custom field to track the specific social media campaign that brought someone to your site, so that you can tell whether they’re one of the CTOs you targeted with your expensive LinkedIn campaign, or a low-level office manager that’s crept in through a promoted post publicising one of your eBooks.
Some of our clients even use custom fields to track things like contract renewals and expiration dates, upgrade or cross-selling potential and subscription type which could be very helpful if you’re trying to increase the lifetime value of pre-existing customers or keep tabs on the type of customers in your pipeline.

How To Set Up Custom Fields In HubSpot
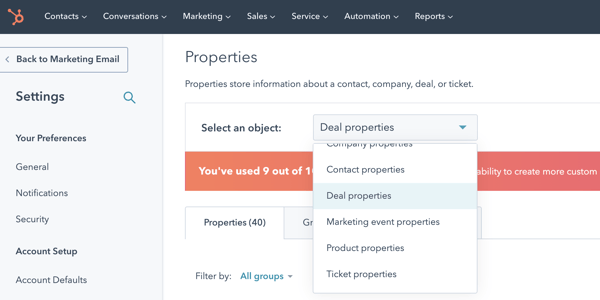
Custom fields are dead easy to set up: Just click the settings icon to the top right of the main HubSpot toolbar, navigate to properties and select the type of object you want to add a custom field for (eg. contacts or organisations).

You can then click ‘create a new property’ and fill out the form that pops up.
Once you’ve hit save, you’ll be able to click into a contact or company using the drop-down on the main HubSpot menu, and add some information to your new fields.
Your new fields should also start showing up as default options in HubSpot forms and chat bots, so you can start gathering the required data automatically.
But don’t rush off and start adding custom fields just yet. It’s very easy to get carried away here; filling your dashboard with meaningless clutter and accidentally drowning your sales team in the process, which is why we’d always recommend that you pencil in a couple of hours to sit down and reflect on what you’d like to track in your CRM.
You want to focus on data that’ll actually speed up day-to-day processes. Information that your sales team can use to streamline their activity and access the leads that are most likely to turn into paying customers.
Because that is the primary purpose of this exercise. It’s easy to get lost in the fine detail, but you’re here to make money and every optimisation, customisation and integration needs to serve that goal.
Tip #3: Automate Grunt Work
Speaking of getting rid of busywork, we’d also recommend taking a look at HubSpot Sales Hub’s automation tools.
Hidden in cluttered drop-downs or inconspicuous button-menus, these sophisticated tools nonetheless allow you to do some properly clever things with your CRM setup. You can use them to set up automatic email sequences that send follow up emails to prospective customers until they take a specific action (like replying to your messages or booking a meeting), at which point the automated sequence will terminate so that your sales reps can take over and focus on closing the sale.
They can also be used to score leads so that you can prioritise deals that are likely to convert, and automatically assign deals to a specific rep based on its value or their availability – allowing you to take a relatively hands-off approach to lead assignment.
And if that wasn’t enough, you can even use HubSpot’s automation tools to automatically remove dead deals from your pipeline; freeing up those long Friday afternoons you used to spend manually deleting the records associated with unresponsive leads.
Now, it goes without saying that some of these features won’t be useful for your business; every sales department is different and one person’s life saving time-hack is another person’s worst nightmare but it’s worth taking some time to familiarise yourself with the automation tools available in HubSpot because there’s bound to be at least one thing in there that saves you time.
For now, we’re going to focus on teaching you to use one of our favourite automations: Setting up automated reminder tasks that trigger when a deal moves from stage to stage.

How To Set Up Automated Reminder Tasks On HubSpot
Say a deal changes stage when a key decision maker is involved in the process, you could set up an automated reminder that would prompt your sales team to introduce themselves to your new contact or invite everyone to a presentation showcasing your product or service offering.
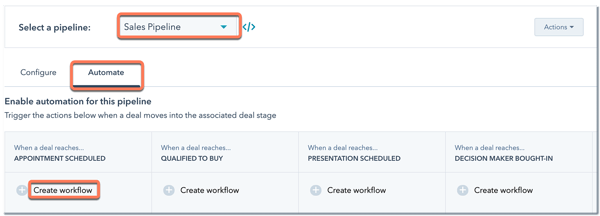
To set up one of these automated reminders, click the settings icon on the main HubSpot menu bar, navigate to Objects > Deals, click the pipelines tab, select the pipeline you want from the drop down and hit ‘automate’
 You’ll then see a table showing the different deal stages in your pipeline. Pick the one you want, hit ‘create workflow’ and fill out the panel that pops up on the right.
There’s an in-depth guide from HubSpot here, but the whole process is fairly straightforward and most of the prompts are self explanatory.
Tip #4: Track, Review, Refine, Repeat
This one’s less about HubSpot and more about good practices, but it’s worth noting that HubSpot’s customisable dashboards certainly make it easier to track and monitor your sales activity.
Once you’ve set up all of your fancy integrations and automations, you’ll want to spend a fair bit of time making sure that they’re actually helping your sales guys. All too often, people set up complex pipelines and email workflows that are designed to nurture lukewarm leads or make it easier for people to track high-priority prospects, only to find that their team is spending more time trying to pause the emails than they are chatting to potential customers.
Don’t fall into the trap of being too clever for your own good. Instead, make a couple of sensible changes that have the potential to increase productivity and then wait a week or so to see if they’ve worked. If everyone’s happy, productivity is up and you can see people chasing down leads then it’s probably safe to up the ante and make a few more improvements.
But if it’s hard to tell whether your tweaks have had the right effect, it’s probably more worthwhile to sit down and work out what you’ve got wrong.
The process of improving your sales process is never simple or straightforward. There are bound to be bumps in the road and you’re all but guaranteed to make a couple of mistakes. The good news is that HubSpot’s CRM makes it very easy to test new ideas and setups so don’t be afraid to experiment a little bit.

Still Struggling To Get The Most Out Of HubSpot’s CRM?
We’ve been using HubSpot’s CRM to manage our own sales process for some years now, so we’re well placed to offer hands-on advice or help you set up some of the automations mentioned here.
We’re also a HubSpot partner agency that specialise in helping B2B clients integrate and use Sales Hub™ and other HubSpot products. We’d love to hear from anyone who’s keen to improve their setup or integrate HubSpot with their website so if you're reading this and thinking "please, help me out", just drop us a message here.

